Introduction
This library provides the unofficial Python bindings for the NVM Library. The bindings were created using the Python CFFI package (C Foreign Function Interface for Python).
Overview and Rationale
Currently, there are no Python packages supporting persistent memory, where by persistent memory we mean memory that is accessed like volatile memory, using processor load and store instructions but retaining its contents across power loss just like traditional storages.
The goal of this project is to provide Python bindings for the libraries part of the NVM Library. The pynvml project aims to create bindings for the NVM Library without modifying the Python interpreter itself, thus making it compatible to a wide range of Python interpreters (including PyPy).
These bindings were created using the Python CFFI package (C Foreign Function Interface for Python).
Note
This is not an official port of the NVM Library.
How it works
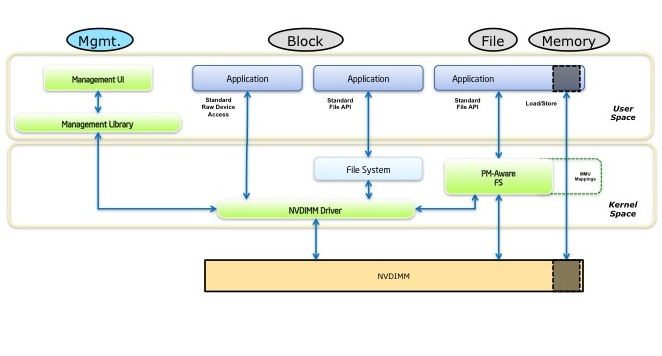
Image from: http://pmem.io
In the image above, we can see different types of access to a NVDIMM device. There are the standard and well known types of access like the one using the standard file API (fopen/open, etc.), and the type of access that we’re really interested which is the one on the right using Load/Store and bypassing the Kernel space code. This is the shortest kind of access an application can do to access the memory, and in our case, this is not only a traditional kind of volatile memory, it is a persistent memory, and this is why it is so important, because you don’t need to serialize data to disk anymore, you just need to keep your data structures in memory, and now this data is also persistent. However with great powers comes great responsabilities, now it is duty of your application to provide things such as flushes and hardware drains (i.e. CLWB/PCOMMIT instructions), that is where this framework and Intel’s NVM Library comes in.
Installation and Requirements
To install pynvm, you’ll need to meet some requirements:
- NVM Library (install instructions at Github)
After installing the requirements, you’ll just need to install the pynvm from the Python PyPI repositories using pip:
pip install pynvm
pip will automatically install all dependencies for the Python package and then you should be able to use the package.
Getting Started
In this section you’ll find tutorials on how to use each library supported by the pynvm framework.
Using pmem (low level persistent memory)
The pmem module exposes a “pythonic” interface to the nvm.pmem API, which
provides low level persistent memory support.
See also
For more information regarding the libpmem, please
refer to libpmem manual or
to the documentation on the API itself at nvm.pmem.
Opening files, writting and reading
You can see an example below on how to use the pmem API:
import os
from nvm import pmem
from fallocate import posix_fallocate

# (optional) check the pmem library version
pmem.check_version(1, 0)

# Open file to write and fallocate space
fhandle = open("dst.dat", "w+")
posix_fallocate(fhandle, 0, 4096)

# mmap it using pmem
reg = pmem.map(fhandle, 4096)

# Write on it and seek to position zero
reg.write("lol" * 10)
reg.write("aaaa")
reg.seek(0)

# Read what was written
print reg.read(10)
print reg.read(10)

# Persist the data into the persistent memory
# (flush and hardware drain)
pmem.persist(reg)
Context managers for flush and drain and numpy buffers
You can also use context managers present in the API like the FlushContext
or the DrainContext:
import os
import numpy as np
from nvm import pmem
from fallocate import posix_fallocate

fhandle = open("dst.dat", "w+")
posix_fallocate(fhandle, 0, 4096)

# Will persist (pmem_persist) and unmap
# automatically
with pmem.map(fhandle, 4096) as reg:
    reg.write("lol" * 10)
    reg.write("aaaa")

    # This will create a numpy array located at
    # persistent memory (very cool indeed) where you
    # can reshape as you like
    n = np.frombuffer(reg.buffer, dtype=np.int32)
    print n.shape

# Flush context will only flush processor caches, useful
# in cases where you want to flush several discontiguous ranges
# and then run hardware drain only once
m = pmem.map(fhandle, 4096)
with pmem.FlushContext(m) as reg:
    reg.write("lol" * 10)
    reg.write("aaaa")

# Will only execute the hardware drain (aka PCOMMIT)
m = pmem.map(fhandle, 4096)
with pmem.DrainContext(m) as reg:
    reg.write("lol" * 10)
    reg.write("aaaa")

fhandle.close()
Using pmemlog (pmem-resident log file)
The pmemlog module exposes a “pythonic” interface to the nvm.pmemlog API, which
provides pmem-resident log (append-only) file memory support.
See also
For more information regarding the libpmemlog, please
refer to libpmemlog manual or
to the documentation on the API itself at nvm.pmemlog.
Creating log pool and appending into it
You can see an example below on how to use the nvm.pmemlog API:
from nvm import pmemlog

# Create the logging and print the size (default is 2MB when not
# specified)
log = pmemlog.create("mylogging.pmemlog")
print log.nbyte()

# Append to the log
log.append("persistent logging!")

# Walk over the log (you can also specify chunk sizes)
def take_walk(data):
    print "Data:", data
    return 1

log.walk(take_walk)
# This will show: "Data: persistent logging!"

# Close the log pool
log.close()
Using pmemblk (arrays of pmem-resident blocks)
The pmemblk module exposes a “pythonic” interface to the nvm.pmemblk API, which
provides arrays of pmem-resident blocks support.
See also
For more information regarding the libpmemblk, please
refer to libpmemblk manual or
to the documentation on the API itself at nvm.pmemblk.
Creating block pool and writing into the blocks
You can see an example below on how to use the nvm.pmemblk API:
from nvm import pmemblk

# This will create a block pool with block size of 256 and
# 1GB pool
blockpool = pmemblk.create("happy_blocks.pmemblk", 256, 1<<30)

# Print the number of blocks available
print blockpool.nblock()

# Write into the 20th block
blockpool.write("persistent block!", 20)

# Read the block 20 back
data = blockpool.read(20)
blockpool.close()

# Reopen the blockpool and print 20th block
blockpool = pmemblk.open("happy_blocks.pmemblk")
print blockpool.read(20)

blockpool.close()
Examples
Warning
Under Construction.
